

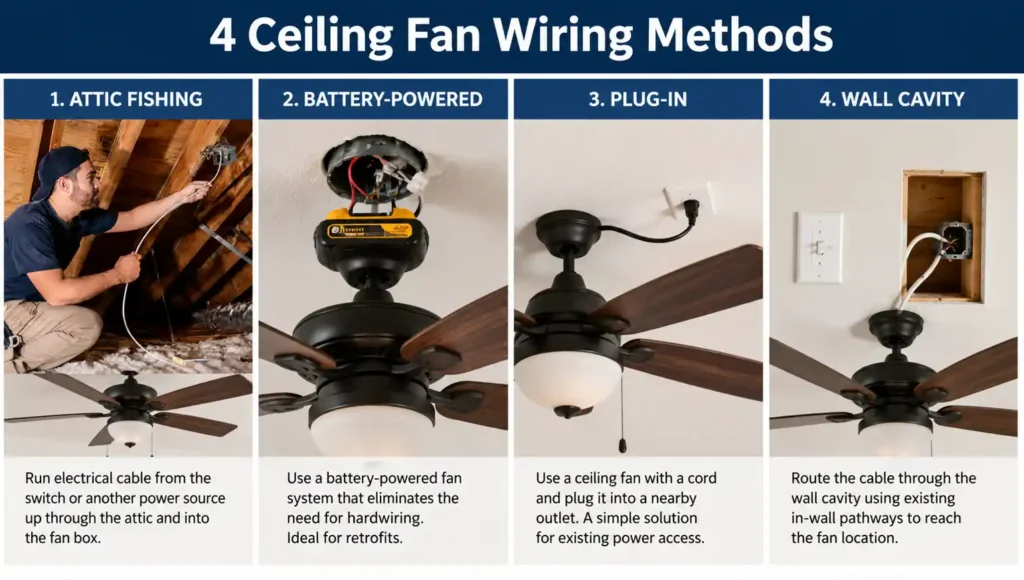
You can install a ceiling fan without existing wiring. Most homes don’t require new circuits or opened drywall to add one. There are four proven methods: fish new wire through an accessible attic, install a battery-powered remote-control fan, run a plug-in cord kit from a nearby outlet, or fish wire through an accessible wall cavity. The right method depends on whether your ceiling has attic access above it.
This is a common problem in Kern County. Bakersfield summers regularly exceed 105°F, and many local homes were built without ceiling wiring in bedrooms, sunrooms, and additions. Builders before the 1980s often wired rooms for a wall switch and outlets only. They left the ceiling itself with no box, no cable, and no power source. That gap leads homeowners to assume the project needs a full rewiring job. Many give up on adding a fan, or pay for more invasive work than the room actually requires.
This guide covers all four methods for how to install a ceiling fan without existing wiring. It includes the cost of each method, which rooms each one fits best, and the exact point where a safe DIY project becomes a job for a licensed electrician.
Why So Many Older Homes Don’t Have Ceiling Fan Wiring
If your Bakersfield or Oildale home was built before the 1980s, there’s a real chance the bedrooms and living spaces were wired for a single wall switch and outlets only, with no ceiling box at all. Builders in that era treated ceiling lighting and fans as an upgrade, not a standard feature. Even in newer homes, secondary bedrooms, sunrooms, converted garages, and additions often get skipped during the original electrical rough-in.
That leaves you with a few realistic scenarios:
- No ceiling box, no wiring, and no accessible attic above the room
- No ceiling box, no wiring, but open attic access above the ceiling
- An existing ceiling light fixture but no separate fan-rated box
- A switch on the wall but the circuit only powers a wall outlet, not the ceiling
Each of these calls for a slightly different solution, which is exactly why “just watch a YouTube video” often leads homeowners down the wrong path. The right fix depends on what’s actually above your ceiling.
Understanding Your Options Before You Start
There isn’t one single method for how to install a ceiling fan without existing wiring there are four realistic paths, and picking the right one saves you time, money, and drywall repair.
Option 1: Run New Wiring Through an Accessible Attic
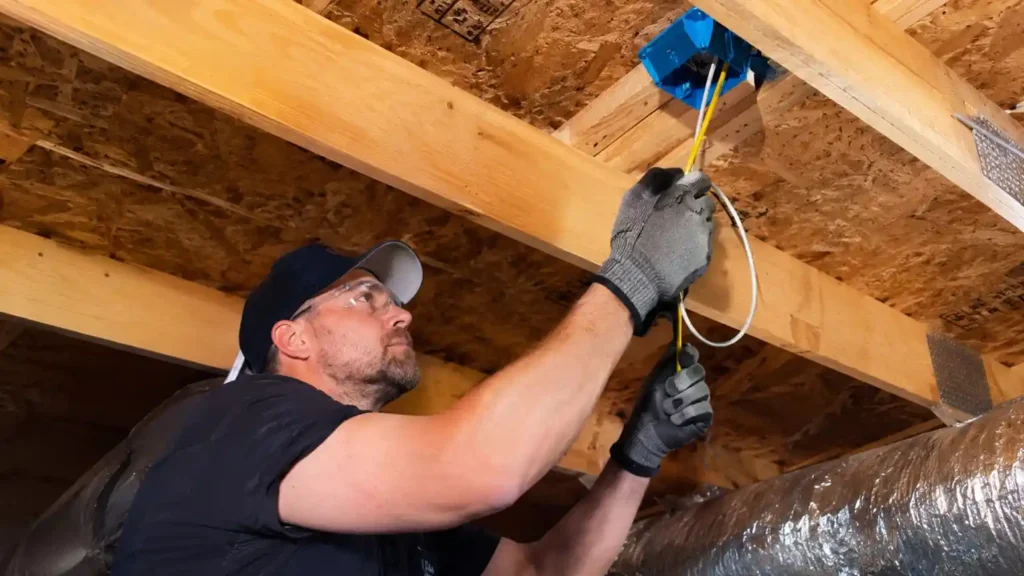
If you have attic access directly above the room, this is usually the cleanest solution. An electrician (or a confident, code-aware DIYer) can fish new cable from the attic down through the ceiling to a properly rated electrical box, then run power back to a nearby switch leg or junction point. This gives you a fully hardwired fan with a wall switch that works exactly like it was original to the house.
Best for: Single-story homes, rooms directly beneath an accessible attic, homeowners who want a permanent wall-switch-controlled fan.
Option 2: Use a Battery-Operated or Wireless Remote Fan Kit
Battery-powered ceiling fans have improved significantly. These units mount to a standard ceiling box (or a simple mounting bracket in some models) and run on rechargeable battery packs, controlled entirely by a handheld or wall-mounted remote. No wiring, no attic work, no drywall cuts.
Best for: Renters, rooms with zero attic or crawlspace access, quick fixes where running new cable isn’t practical.
Option 3: Power the Fan from a Nearby Outlet
Some retrofit fan kits are designed to plug into an existing wall outlet, with the cord routed up through a decorative chain, cord cover, or through the wall cavity to the ceiling box. This works well when there’s a wired outlet on the wall directly below or near the fan location.
Best for: Rooms where an outlet already exists near the ceiling fan location and attic access isn’t available.
Option 4: Tap Into an Existing Circuit Through the Wall Cavity
In homes without attic access above the room but with an accessible wall cavity (say, a bedroom that shares a wall with a closet or hallway that has usable access points), an electrician can sometimes fish wire vertically through the wall and into the ceiling. This is more invasive than attic fishing but still avoids opening the entire ceiling.
Best for: Multi-story homes, rooms without attic access but with a nearby accessible circuit.
Comparing Your Options at a Glance
| Method | Requires Attic Access | Wall Switch Control | Typical Cost (Parts + Labor) | Difficulty |
| Attic wire fishing | Yes | Yes | $250–$600 | Moderate to advanced |
| Battery-powered/remote fan | No | Remote only | $150–$400 (kit + install) | Easy to moderate |
| Plug-in cord kit | No | Outlet switch only | $100–$300 | Easy |
| Wall cavity fishing | No (uses walls instead) | Yes | $300–$700 | Advanced |
Pricing varies by home layout, ceiling height, and whether drywall patching is needed. If your project also involves upgrading the switch, adding a dimmer, or dealing with an older breaker panel that can’t take on additional load, costs can shift. For a full breakdown of what local pros typically charge by the hour versus flat rate, our related post on hourly rate electrician pricing walks through what Bakersfield homeowners actually pay.
Step-by-Step: Installing a Ceiling Fan With Attic Access (No Existing Wiring)
This is the most common scenario for single-story Bakersfield homes, and the method that gives you the most permanent, code-correct result.
- Turn off power at the breaker. Confirm with a non-contact voltage tester at the nearest outlet or switch before touching anything.
- Locate the ceiling joist above the desired fan location from the attic side. Fans need to be mounted to a joist or a fan-rated brace, never to drywall alone.
- Install a fan-rated electrical box. This is non-negotiable standard light fixture boxes aren’t built to handle the weight and vibration of a rotating fan. Fan-rated boxes are marked for this use and rated up to 70 lbs for most residential fans.
- Fish new cable from a power source (an existing nearby circuit with available capacity, or back to the panel) through the attic and down into the new box.
- Cut the ceiling opening to the size of the retrofit box, feed the cable through, and secure the box to the joist or brace.
- Run wire to a wall switch location, cutting a switch box opening if one doesn’t already exist, and fishing cable down inside the wall cavity.
- Make all connections, following standard color-coding (black to black, white to white, ground to ground, plus the fan’s blue or separate wire if you’re adding light/fan separate switching).
- Mount the fan bracket, wire the fan, attach the blades, and restore power to test.
This is also the point where many homeowners realize the job has more steps than expected, particularly the switch-leg wiring and confirming the circuit has enough capacity without overloading it. If your home’s panel is older or already near capacity, this is worth flagging before you start cutting into the ceiling.
Step-by-Step: Installing a Battery-Powered or Remote Ceiling Fan
For homes with no attic access and no interest in opening walls, this is the fastest legitimate path to a working ceiling fan.
- Choose a fan-rated mounting location on the ceiling (even without wiring, the fan still needs secure structural mounting, not just drywall anchors for light fans).
- Attach the mounting bracket according to the manufacturer’s instructions, typically using toggle bolts into the ceiling material or directly into a joist if accessible.
- Insert the battery pack and pair the remote or app control.
- Balance the blades and test operation.
Battery-powered fans have real limits most run 8 to 20 hours per charge depending on speed and model, so they’re better suited to occasional-use rooms (guest bedrooms, sunrooms, home offices) than a primary bedroom used nightly.
When You Genuinely Need a Licensed Electrician
DIY ceiling fan installs are popular, and plenty of confident homeowners can handle a straightforward battery-powered swap. But there’s a point where the project stops being a weekend task and starts being a safety and code issue. Call a licensed electrician if:
- There’s no attic access and no accessible wall cavity, meaning cable has to be fished through finished ceiling or multiple walls
- Your home has aluminum wiring, knob-and-tube wiring, or any wiring predating the 1970s
- The nearest circuit is already near capacity and needs load calculations
- You’re adding a switch where no switch box exists and need to cut into finished walls
- The fan location is on a vaulted or sloped ceiling, which changes bracing requirements significantly
- You want the fan and light controlled by separate switches, which requires a 3-wire (plus ground) run instead of standard 2-wire
Improperly mounted fan boxes are one of the more common causes of ceiling fan wobble, noise, and in worse cases the fan eventually pulling loose from the ceiling. A fan spinning at several hundred RPM puts real ongoing stress on whatever it’s anchored to, which is exactly why fan-rated boxes and joist mounting exist as a requirement, not a suggestion.
If your project turns out to need new wiring run from the panel, or your existing wiring is questionable, our team handles ceiling fan installation for homes across Bakersfield and Kern County, including the wiring work needed to do it safely.
Common Mistakes Homeowners Make on This Project
Using a standard light fixture box for a fan. This is the single most common and most dangerous shortcut. Standard boxes aren’t rated for the dynamic load of a spinning fan and can fail over time, especially with larger blade spans.
Skipping the load calculation on an already-loaded circuit. Adding a fan to a bedroom outlet circuit that’s already running window units, space heaters, or multiple devices can trip breakers repeatedly or, worse, overheat wiring.
Assuming every “wireless” fan kit is truly wireless. Some products marketed as wireless still require a hardwired power connection at the ceiling box and are only wireless for the switch/remote control read the specifications carefully before buying.
Ignoring ceiling height and blade clearance. Fan blades need to stay at least 7 feet above the floor per most local code guidance and manufacturer recommendations, which matters in rooms with lower ceilings or sloped sections.
Not checking joist direction before cutting. Cutting a hole before confirming exactly where the joist runs can leave you with no solid structure to mount the fan-rated box to, forcing a second, larger repair.
What This Actually Costs in Bakersfield
Material and labor costs for this project swing based on which method you use and how much cable-fishing or drywall work is involved.
| Project Scope | Typical Total Cost |
| Battery-powered fan, simple bracket mount | $150–$400 |
| Plug-in cord kit fan | $200–$450 |
| Full attic wire fishing with new switch | $350–$700 |
| Wall cavity fishing (no attic access) | $450–$900 |
| Vaulted/sloped ceiling with new bracing | $500–$1,000+ |
These ranges assume a single fan installation with a standard fixture. Costs go up with multi-story fishing, panel upgrades, or if old wiring is discovered mid-project that needs to be addressed for safety.
Ceiling Fans and Energy Efficiency
Beyond comfort, ceiling fans genuinely reduce cooling costs when used correctly, especially in a climate like Bakersfield’s where summer temperatures regularly climb past 100°F. Running a fan alongside your AC lets you raise the thermostat a few degrees without losing comfort, since the moving air makes the room feel several degrees cooler than the actual temperature. This connection between ceiling fans and energy savings is well documented by federal energy guidance, which recommends pairing fans with your AC rather than running fans alone in an empty room, since fans cool people, not spaces. In winter, reversing the blade direction pushes warm air (which naturally rises) back down into the living space.
If you’re planning ceiling fans as part of a broader push to lower your home’s energy costs, it’s worth looking at the bigger picture of your home’s electrical setup, particularly if you’re also considering solar panel installation to offset the additional load from fans, lighting, and HVAC.
Ceiling Fans in Rooms With Existing Light Fixtures
A slightly different but closely related situation: you already have a ceiling light, but no fan-rated box behind it. This is common in dining rooms, living rooms, and older bedrooms. In this case, the wiring already exists, but the box itself likely isn’t rated for a fan’s weight and rotational stress. The fix is usually simpler than a full no-wiring install: swap the existing box for a fan-rated retrofit box using the same wiring, since the hard part (getting power to the ceiling) is already done.
This is also a good moment to evaluate your overall lighting installation setup if you’re planning to combine fan and light upgrades in the same room, since running both projects together often saves on labor compared to doing them separately.
Frequently Asked Questions
Can you install a ceiling fan without existing wiring? Yes. The most common approaches are fishing new wire through attic or wall access, using a battery-powered remote-control fan, or using a plug-in cord kit powered from a nearby outlet. The right method depends on whether you have attic or wall cavity access above the room.
Is it safe to install a ceiling fan yourself without an electrician? Battery-powered and plug-in kits are generally safe for confident DIYers to install, since they don’t involve working inside the electrical panel or running new circuits. Any project requiring new wire runs, new switch boxes, or panel work should be handled by a licensed electrician to meet code and avoid fire risk.
How much does it cost to add ceiling fan wiring to a room that doesn’t have it? Costs typically range from $150 for a simple battery-powered fan to $900+ for full wire fishing through walls with no attic access, depending on the home’s layout and how much cable-running is involved.
Do I need a special electrical box for a ceiling fan? Yes. Ceiling fans require a fan-rated electrical box, which is built to handle the fan’s weight and the vibration created during rotation. Standard light fixture boxes are not rated for this and can fail over time.
Can I run a ceiling fan off a regular wall outlet? Some fan models are designed with a plug-in power cord specifically for this purpose, routed up the wall to the ceiling. A standard hardwired fan should never be improvised to run off an extension cord or exposed wiring, since this isn’t code-compliant or safe long-term.
How long does it take to install a ceiling fan without existing wiring? A battery-powered fan install typically takes 1–2 hours. A full wire-fishing installation with a new switch usually takes 3–6 hours depending on attic access and ceiling height.
Getting It Done Right the First Time
Adding a ceiling fan to a room with no existing wiring is one of those projects that looks simple online and gets more complicated the moment you’re standing on a ladder looking at a blank ceiling. The method that works for your neighbor’s single-story ranch house might not work at all in your two-story home with no attic access above the bedroom. Matching the right approach to your home’s actual structure rather than forcing a generic solution is what separates a fan that runs quietly for fifteen years from one that wobbles, hums, or eventually needs to be redone.
If you’d rather skip the attic crawling and wire fishing altogether, our licensed residential electricians handle ceiling fan wiring and installation throughout Bakersfield, Oildale, and the surrounding Kern County communities, with upfront pricing before any work begins . And if you discover mid-project that your wiring is older than expected or something looks off behind the walls, our 24 Hour Electrician service is available for anything that can’t wait